Big 3 Combo
There are 3 things that need to come together to match the criteria of my favorite options trading setup. Since taking trades with this strategy, I’ve been able to uphold an 80%+ win rate in a “messy” to say the least market environment. The alerts for these trades were sent to members of the Compounding Growth Mastery and/or the Simpler Central room.
As we walk through this simple 3-step checklist, we’ll review the tools and settings needed on your trading charts. There are a few simple tools that you will need to execute this strategy.
UPDATE: Big 3 Heat Map
I put together a “Big 3 Heat Map” that helps us confirm signals across multiple timeframes at a glance. While I can’t share the proprietary Big 3 Heat Map, I created a free “Moving Average Heat Map” for our subscribers that might not have the Big 3 indicators.
Here’s a flexible grid for the MA heat map: http://tos.mx/NDnDM3X
Daily 21 Exponential Moving Average (EMA) a.k.a. “Daily Mean”
The daily 21 exponential moving average (EMA) is vital as this will act as our entry point (and the first step of our checklist).
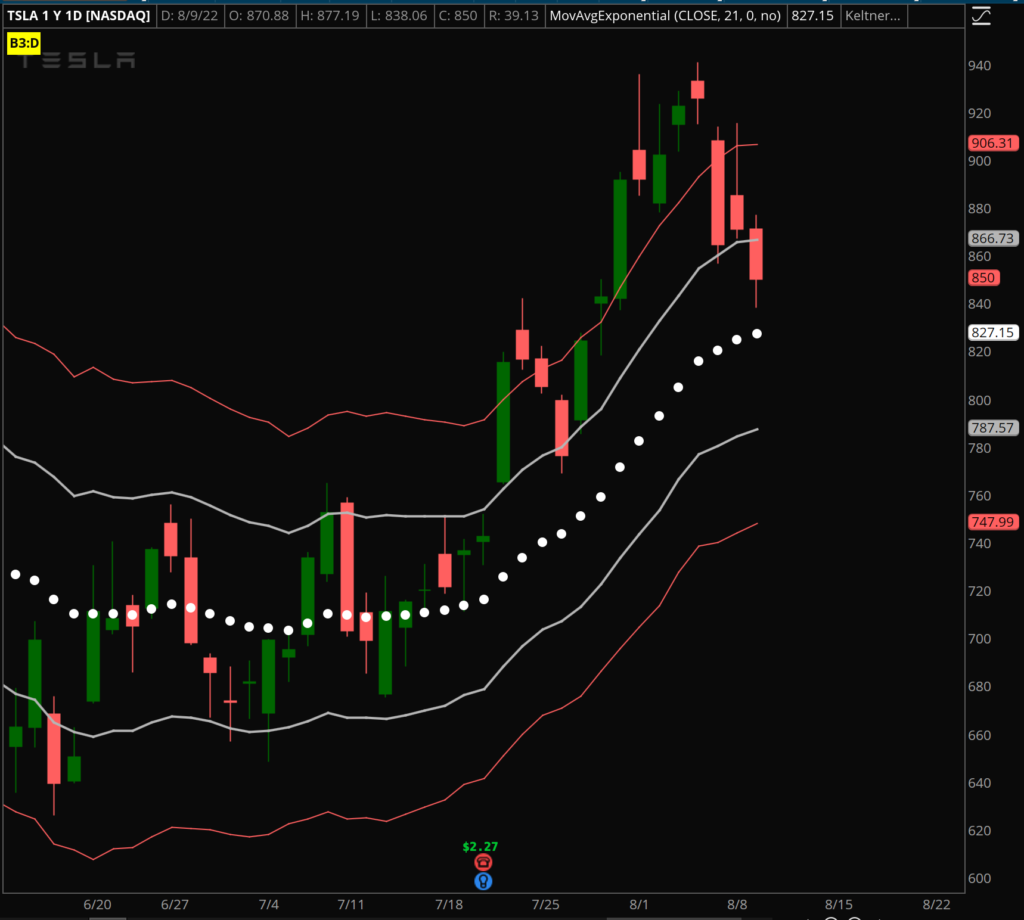
First we’ll need to review the concept of reversion to the mean: understanding that stocks generally make a move from the daily 21 EMA and typically make 2 average true range (ATR) moves away from there. As the stock approaches 2+ ATR, there is a growing probability that it will revert back to the 21 EMA.
Below you’ll find the settings for adding the 21 EMA:
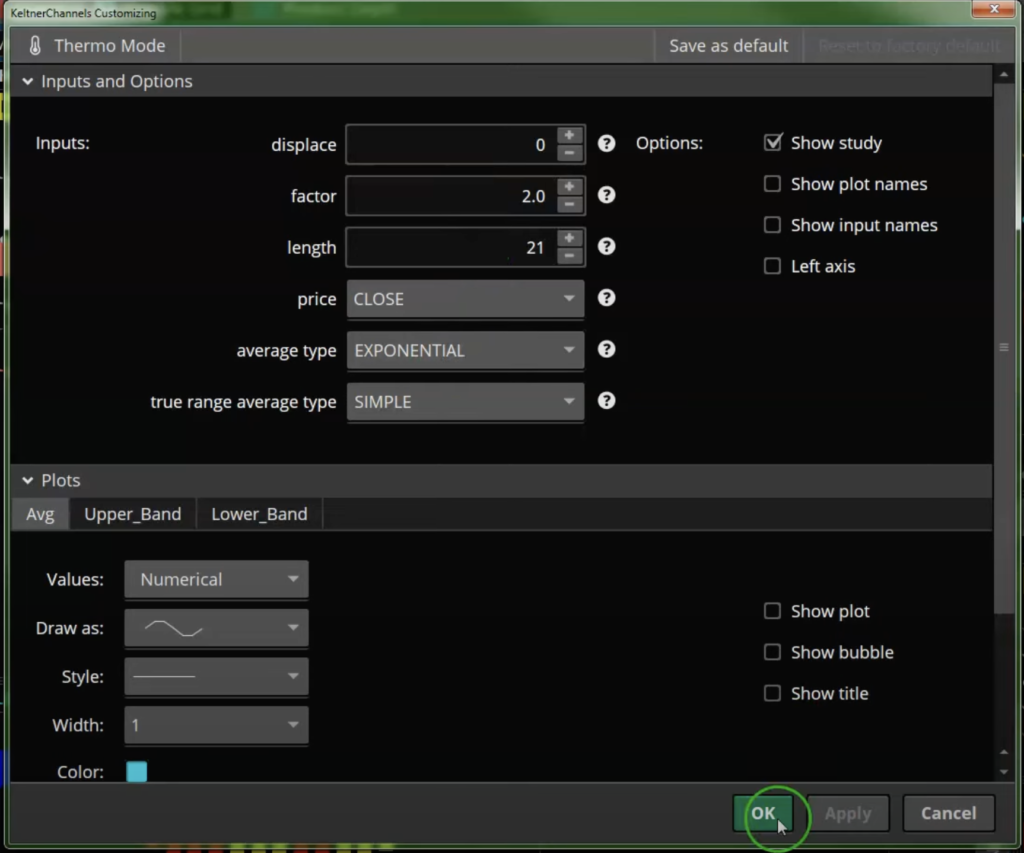
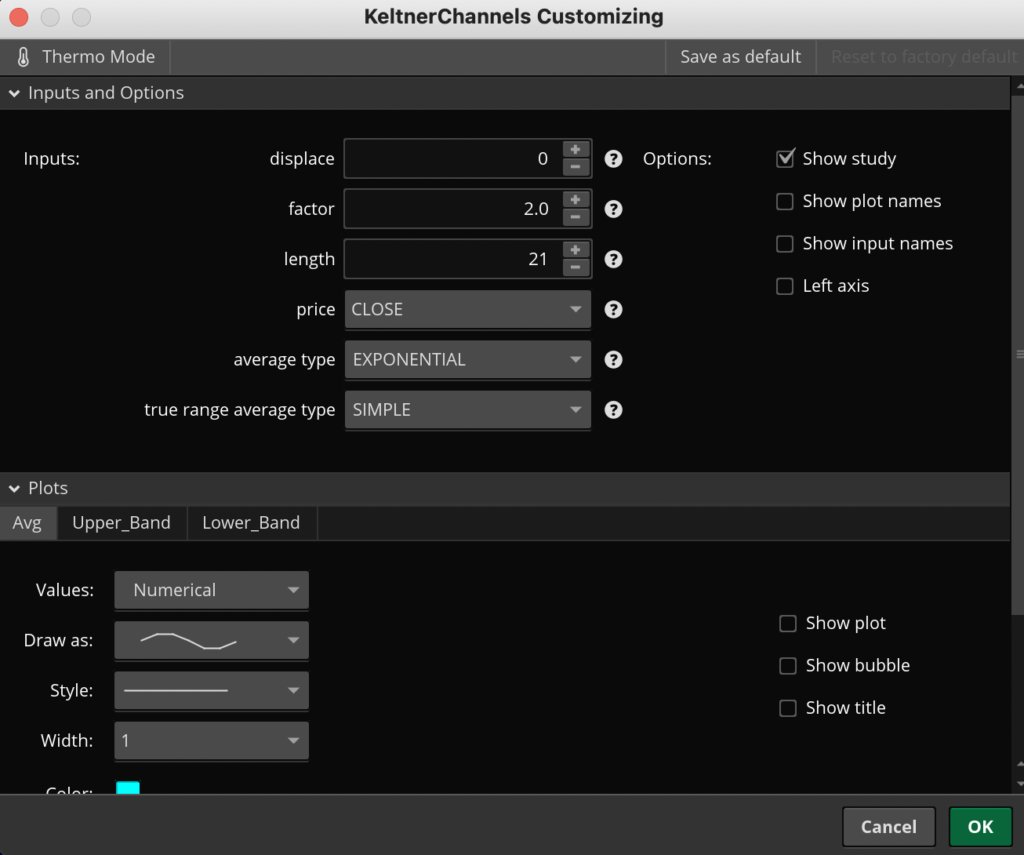
Keltner Channels
We’ll need to add keltner channels to our charts to measure average true range moves above the 21 EMA.
Note in the screenshot below that the grey lines are 1+/- ATR moves away from the 21 EMA, and the red lines are 2+/- ATR moves away from the mean.
Keep in mind that you can adjust the colors of the lines by clicking on the “Upper_Band’ and “Lower_Band” tabs.

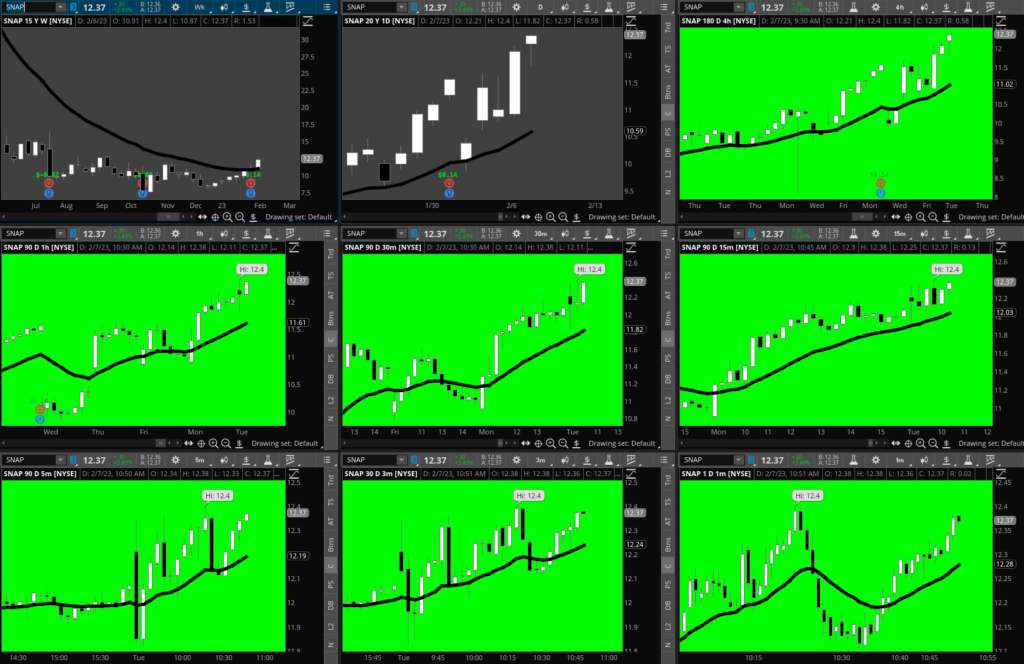
Now that you have the 21 EMA and keltner channel extensions added to our charts, you can look at stocks and see how price will move from the daily 21 EMA, head toward 2+/- ATR, and revert back to the mean.
Take a look at an example of this on NVDA below.
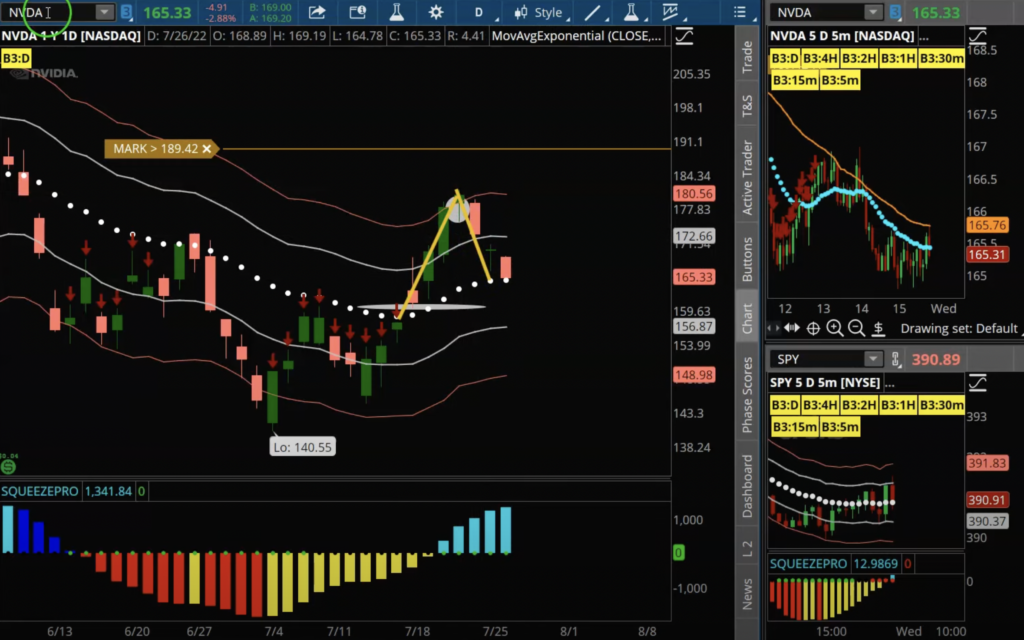
Our goal is to catch the push from the daily 21 EMA to 2+ ATR. Think of the daily 21 EMA as our “launching pad.”
Big 3 Indicator
The next tool you’ll need to execute this strategy is the Big 3 Buy and Sell Signals indicator. This innovative indicator combines a number of factors that measure trend, structure, and momentum to guage the path of least resistance.
The Big 3 indicator helps signal when a setup is bullish or bearish, when and where to get long or short, and when to GTFO (Get The Funds Out). With the proper tools, we should be able to gauge whether a setup is worth our time (for longs or shorts) in a split second.
If we’re wanting to get long, we’ll look for Big 3 buy signals (a green arrow) on lower timeframes, whether that be a 15-min or 30-min chart, etc. We are finding the moment in time where trend, structure, and momentum come together to trigger a lower time frame Big 3 buy signal. This serves as our entry signal that takes us to +2 ATR on the daily chart.
For an even deeper dive on the Big 3 signals, check out my 4-hour+ training course breaking down how to pinpoint clean setups and avoid weaker trades. (And get a quarterly membership to the Compounding Growth Mastery when you sign up for the Elite package)
The Big 3 Squeeze
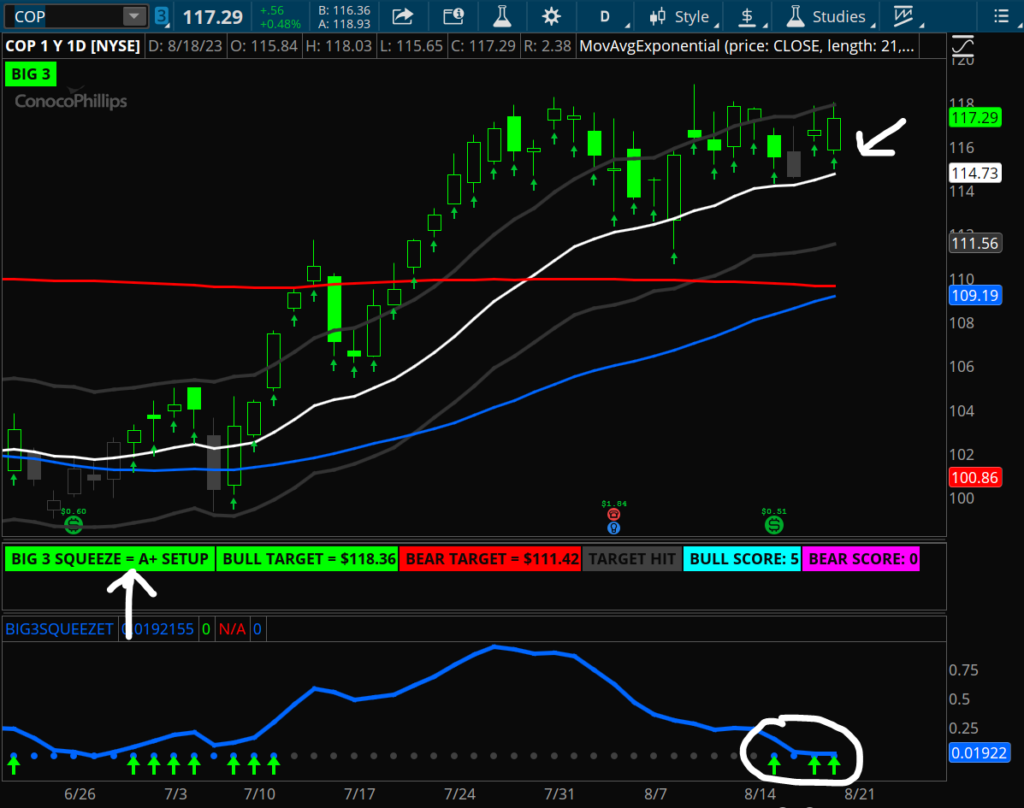
As a big fan of the squeeze, I modified the original squeeze with the Big 3 Signals and created my Big 3 Squeeze. The Big 3 Squeeze helps answer the common question with the squeeze, “Which direction is the squeeze going to fire?”.
The Big 3 squeeze’s histogram labels show us when a setup is considered A+ for a possible entry. And with the help of the Bull and Bear score labels, we can see which direction the setup favors, the bears or the bulls.
You’ll see on the COP screenshot below how the Big 3 Squeeze works. The histogram will turn green for an A+ Setup, this means it’s hitting my criteria for what I think is an A+ trade. The bull score label is at 5, which is the best number, and the Big 3 is giving us a green buy arrow plus green arrows on the histogram. This makes for the perfect opportunity to go long.
This is another example of a trade I took with my Compounding Growth Mastery members on AMD.
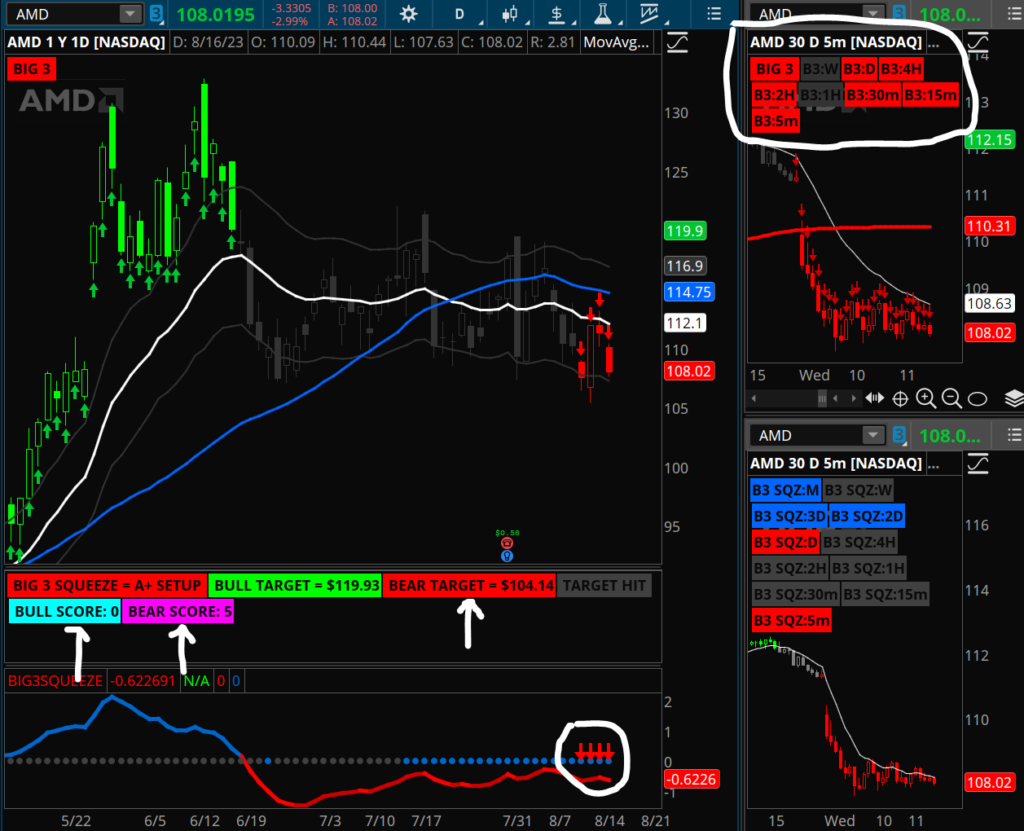
I bought a put debit spread looking for the daily bear squeeze to fire shortly into $104ish. In this example, the Bear Score label showed a 5, which is the highest number for the histogram, meaning a good short could happen. It also had multiple squeeze labels red on multiple time frames, indicating a possible move lower. On top of everything else, the Big 3 Squeeze A+ Setup label being red and red arrows on the histogram, this was the perfect setup to head lower on AMD.
Other Tips to help you out:
Step 1: Find a stock trading right above the daily 21 EMA.
Step 2: Find Big 3 buy signals on lower time frames.
Step 3: Match those lower time frame buy signals with lower time frame squeezes.
Tips before you go:
- Do not get long below the Daily 21 EMA.
- Look for lower timeframes to change from neutral to bullish Big 3 signals (yellow to green).
- The goal is to get an entry as early as possible once the signals pop up.
- The same principles apply to the downside, just flipped.
I hope you’ve enjoyed this break down of how to apply the Big 3 indicator to one of our favorite options trading strategies. If you have any questions, reach out to our awesome support staff at [email protected] or 512-266-8659.
Stay Focused,
Focused Trades